Sunday, 4 August 2013
Useful Android adb Network debugging commands
Capture network traffic to pcap file:
adb -e shell tcpdump -s 1500 -w /sdcard/capture.pcap
Transfer pcap file from emulator to host pc
adb pull /sdcard/capture.pcap
The pcap file can then be opened in Wireshark.

Sunday, 19 May 2013
Pebble Controlled Raspberry PiBot
The Pebble 2 way Communication SDK for Andoid and iOS has just been released, so what better way to try it out than by adding Pebble controls to my Raspberry PiBot Controller.
Pressing up on the Pebble steers left, select is a toggle between forwards or stop and down steers right.
The web service on the Pi returns a Json status message which is displayed on the Tablet Console. The tablet app also features voice commands via Android Google's android services.

This is also repeated onto the Pebble when a command is sent from either device.

The code for the Pebble app can be found at https://bitbucket.org/chughes42/pebble-pibot-app and is based on the examples included with the Pebble SDK.
Pressing up on the Pebble steers left, select is a toggle between forwards or stop and down steers right.
The web service on the Pi returns a Json status message which is displayed on the Tablet Console. The tablet app also features voice commands via Android Google's android services.

This is also repeated onto the Pebble when a command is sent from either device.

Tuesday, 14 May 2013
Walk the Wight 2013
On Sunday I took part in Walk the Wight 2013, a 26.5 mile sponsored walk in aid of Earl Mountbatten Hospice. The route takes in most of the length of the Island incorporating the Tennyson Trail and includes some wonderful views of the island (weather pending).
In keeping with my usual habit of using gadgets in everything I do I decided to try and record my progress via one of the fitness apps available on my phone. I backed the Pebble smart watch on kickstarter.com and one of the first apps to support it is Runkeeper so that was a logical choice. Runkeeper tracks the route, speed and altitude and lets you view you result via a web portal (the Runkeeper results can be view at http://rnkpr.com/a2ywwyb).
The Pebble has it's own application running on the phone managing the blue tooth connection and providing some notifications, this can be further extended using Pebble Notifier which relays notifications displayed on the phone to the pebble so any tweets or SMS messages I received during the walk were displayed on my wrist instead of having dig my phone out of my bag. This was especially nice in the last few miles of the walk when the weather took a turn for the worse and it was nice to get encouraging messages coming through from friends.
Keeping the GPS running on a phone is a sure way to flatten the battery, so keeping it running for 9+ hours of the walk was going to be an issue. When I was building my Pi Bot project I used a Pebble Smart stick as a power supply, so this was ideal to extend the power to my phone. I have recently switched to using a LG Nexus 4 but it is rather power hungry compared to my older Nexus S so I decided to use my Nexus S instead to further improve the power consumption.
I raised around £120 for the hospice and for most of the walk the weather was sunny and enjoyable even if the last bit did end up rather wet. This was the third time I have taken part in Walk the Wight and every time it is wet I say I am not doing it again but I suspect once my aching muscles have recovered I will think about doing it again sometime.
Links:
Earl Mountbatten Hospice http://www.iwhospice.org/
Pebble Notifier https://play.google.com/store/apps/details?id=com.dattasmoon.pebble.plugin
RunKeeper https://play.google.com/store/apps/details?id=com.fitnesskeeper.runkeeper.pro
Pebble Smart Watch http://www.getpebble.com
Pebble SmartStick http://www.veho-uk.com/main/shop_detail.aspx?article=176
 |
| Walk the Wight Route plotted via RunKeeper |
In keeping with my usual habit of using gadgets in everything I do I decided to try and record my progress via one of the fitness apps available on my phone. I backed the Pebble smart watch on kickstarter.com and one of the first apps to support it is Runkeeper so that was a logical choice. Runkeeper tracks the route, speed and altitude and lets you view you result via a web portal (the Runkeeper results can be view at http://rnkpr.com/a2ywwyb).
The Pebble has it's own application running on the phone managing the blue tooth connection and providing some notifications, this can be further extended using Pebble Notifier which relays notifications displayed on the phone to the pebble so any tweets or SMS messages I received during the walk were displayed on my wrist instead of having dig my phone out of my bag. This was especially nice in the last few miles of the walk when the weather took a turn for the worse and it was nice to get encouraging messages coming through from friends.
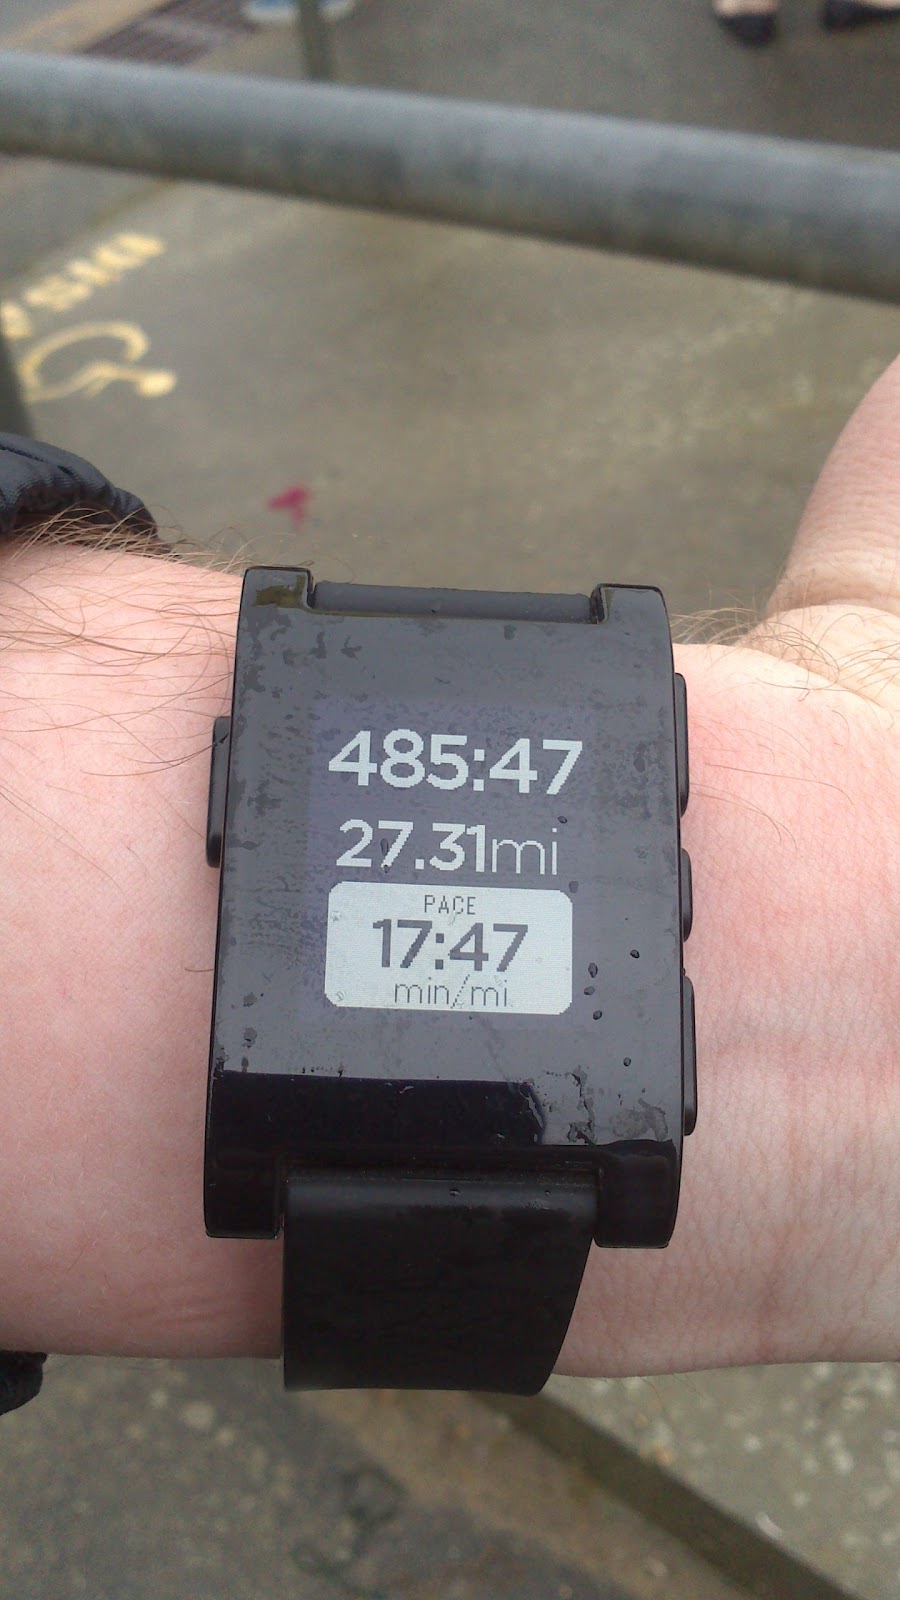 |
| Pebble Watch showing data from the RunKeeper App running on my Nexus S |
I raised around £120 for the hospice and for most of the walk the weather was sunny and enjoyable even if the last bit did end up rather wet. This was the third time I have taken part in Walk the Wight and every time it is wet I say I am not doing it again but I suspect once my aching muscles have recovered I will think about doing it again sometime.
 |
| Finished and you even get a medal! |
Links:
Earl Mountbatten Hospice http://www.iwhospice.org/
Pebble Notifier https://play.google.com/store/apps/details?id=com.dattasmoon.pebble.plugin
RunKeeper https://play.google.com/store/apps/details?id=com.fitnesskeeper.runkeeper.pro
Pebble Smart Watch http://www.getpebble.com
Pebble SmartStick http://www.veho-uk.com/main/shop_detail.aspx?article=176
Tuesday, 5 March 2013
Pi Bot Eclipse Project Repos

Android Pi Controller
Java Servlet (PiBot control code)
I recently gave a chat/demo at #IWDEV 9 using the below slides.
#IWDEV 9 slides
Saturday, 2 March 2013
First run for Raspberry Pi Bot
First test run for my Raspberry Pi powered bot inspired by cymplecy's blog (http://cymplecy.wordpress.com/). I found the magician chassis on a hobby site and was then directed to the blog by a friend. cymplecy used Scratch to program the Pi, I have once again gone for the Pi4J library to control the GPIO port from Java code, running inside a Jetty servlet container.
Apart from it's going backwards, not to bad for a first run.
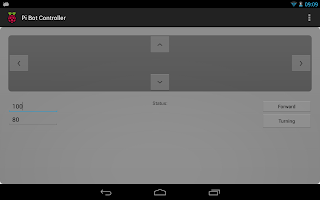
Screenshot from the Android application running on my Nexus 7. The forward and turning speeds can be adjusted and a status is displayed in the lower centre of the screen when a new instruction is sent to the Pi.

Screenshot from the Android application running on my Nexus 7. The forward and turning speeds can be adjusted and a status is displayed in the lower centre of the screen when a new instruction is sent to the Pi.
Friday, 22 February 2013
Controlling the Berry Clip/Raspberry Pi from a Java Web Service/Servlet

I decide to use the Jetty Servlet engine. This is a light weight web server and would take less resources than using an instance of Apache Tomcat. This was downloaded from http://www.eclipse.org/jetty/ and installed onto the Pi .Once installed jetty can be started going to the installation directory and issuing the command:
sudo java -jar start.jar
Jetty on it's own does not require sudo access but to access the GPIO port on the pi requires root. This is not a good idea for any production environments or internet facing services.
I then created my servlet code and configuration in Eclipse on my desktop pc. The code was exported from eclipse as a war file and then copied into the webapps directory of jetty on the pi. If jetty is running it will scan this directory and automatically install the servlet. I found if updating the war file it was a good idea to restart jetty or strange errors seem to creep in.
I added a basic html form to allow the number of the LED to be activated to be entered by the user and posted to the servlet.
This is accessible at:8080/BerryPi_Servlet/
I added a basic html form to allow the number of the LED to be activated to be entered by the user and posted to the servlet.
 |
| The form allowing users to select an LED |
This is accessible at
The code is once again built using the Pi4J library from the Pi4J Project (http://pi4j.com/).
The Eclipse project including the exported WAR file can be found on bitbucket:
https://bitbucket.org/chughes42/berryclipws/src
The bulk of the java code is shown below
BerryPiWS.java
package com.qubecad.pi.berrypiws;

import java.io.IOException;
import java.io.PrintWriter;

import javax.servlet.ServletException;
import javax.servlet.http.HttpServlet;
import javax.servlet.http.HttpServletRequest;
import javax.servlet.http.HttpServletResponse;

import com.pi4j.io.gpio.GpioController;
import com.pi4j.io.gpio.GpioFactory;
import com.pi4j.io.gpio.GpioPinDigitalOutput;
import com.pi4j.io.gpio.PinState;
import com.pi4j.io.gpio.RaspiPin;

/**
 * Servlet class BerryPiWS to Control the Berry Clip for the raspberry Pi
 * available from http://www.raspberrypi-spy.co.uk/
 */

public class BerryPiWS extends HttpServlet {
 private static final long serialVersionUID = 1L;
 GpioController gpio;
 GpioPinDigitalOutput pina;
 GpioPinDigitalOutput pinb;
 GpioPinDigitalOutput pinc;
 GpioPinDigitalOutput pind;
 GpioPinDigitalOutput pine;
 GpioPinDigitalOutput pinf;

 /**
  * Default constructor.
  */
 public BerryPiWS() {

  GpioController gpio = GpioFactory.getInstance();

  // Set up the pins and set low to start
  System.out.println("Setting up GPIO Pins for output");
  pina = gpio.provisionDigitalOutputPin(RaspiPin.GPIO_07, "Pin A",
    PinState.LOW);
  pinb = gpio.provisionDigitalOutputPin(RaspiPin.GPIO_00, "Pin B",
    PinState.LOW);
  pinc = gpio.provisionDigitalOutputPin(RaspiPin.GPIO_03, "Pin C",
    PinState.LOW);
  pind = gpio.provisionDigitalOutputPin(RaspiPin.GPIO_12, "Pin D",
    PinState.LOW);
  pine = gpio.provisionDigitalOutputPin(RaspiPin.GPIO_13, "Pin E",
    PinState.LOW);
  pinf = gpio.provisionDigitalOutputPin(RaspiPin.GPIO_14, "Pin F",
    PinState.LOW);

 }


 /**
  * @see HttpServlet#doPost(HttpServletRequest request, HttpServletResponse
  *      response)
  */
 protected void doPost(HttpServletRequest request,
   HttpServletResponse response) throws ServletException, IOException {
  // get the number of the LED to turn on and print to console
  String action = request.getParameter("action");
  System.out.println("action=" + request.getParameter("action"));

  try {

   // activate the request light, pause and reset.
   if (action.equals("1")) {
    System.out.println("A high");
    pina.high();
    Thread.sleep(1000);
    pina.low();

   } else if (action.equals("2")) {
    System.out.println("B high");
    pinb.high();
    Thread.sleep(1000);
    pinb.low();

   } else if (action.equals("3")) {
    System.out.println("C high");
    pinc.high();
    Thread.sleep(1000);
    pinc.low();

   } else if (action.equals("4")) {
    System.out.println("D high");
    pind.high();
    Thread.sleep(1000);
    pind.low();

   } else if (action.equals("5")) {
    System.out.println("E high");
    pine.high();
    Thread.sleep(1000);
    pine.low();

   } else if (action.equals("6")) {
    System.out.println("F high");
    pinf.high();
    Thread.sleep(1000);
    pinf.low();

   }

  } catch (InterruptedException e) {

   System.out.print("Exception ");
  }

  // display the LED select form on the return page

  PrintWriter out = response.getWriter();

  String pagehtml = "";

  // if there was a valid LED number display a message

  if ("123456".contains(action)) {
   pagehtml = pagehtml + "
LED number " + action + " selected
";

  }
  String pagehtmlform = "
";
out.println(pagehtml + pagehtmlform);
}
}
Links:The Pi4J Project http://pi4j.com/
Raspberry Pi Spy http://www.raspberrypi-spy.co.uk/berryclip-6-led-add-on-board/
Jetty Web Server http://www.eclipse.org/jetty/
Thursday, 21 February 2013
Using an Ultrasonic Range Finder with the Raspberry Pi from Java.
A little while ago I bought an ultrasonic range finder from ebay to see if I could get it working with my Raspberry Pi. I got it working from Python and then demonstrated it to #IWDEV a local group of developers who meet to chat about developing on the Isle of Wight, as part of an open chat about the Raspberry Pi.
It seemed the logical progression was to try and get it working from Java. The resulting code is shown below. I first tried to use an event listener to capture the results from the senser but failed to get it working (wondering it if it is a timing/sensitivity issue) so I have resulted to using a loop which checks the pin state.
As per my earlier post about using a stepper motor I have used the Pi4J library to access the Pi's GPIO port.
There is a guide to connecting the sensor to the Pi by +RaspberryPi Spy at http://www.raspberrypi-spy.co.uk/ if you are interested in giving it ago.
RangeFinder.Java:
package com.qubecad.pi.PiBot;

import com.pi4j.io.gpio.GpioPinDigitalInput;
import com.pi4j.io.gpio.GpioPinDigitalOutput;
import com.pi4j.io.gpio.PinState;
import com.pi4j.io.gpio.event.GpioPinDigitalStateChangeEvent;
import com.pi4j.io.gpio.event.GpioPinListenerDigital;

public class RangeFinder {
 double result = 0;
 GpioPinDigitalOutput firepulse;
 GpioPinDigitalInput result_pin;

 RangeFinder(GpioPinDigitalOutput trigger, GpioPinDigitalInput result_pin) {

  this.firepulse = trigger;
  this.result_pin = result_pin;

 }

 /**
  *
  * Trigger the Range Finder and return the result
  *
  * @return
  */
 public double getRange() {
  System.out.println("Range Finder Triggered");
  try {
   // fire the trigger pulse
   firepulse.high();

   Thread.sleep(20);
  } catch (InterruptedException e) {

   e.printStackTrace();
   System.out.println("Exception triggering range finder");
  }
  firepulse.low();

  // wait for the result

  double startTime = System.currentTimeMillis();
  double stopTime = 0;
  do {

   stopTime = System.currentTimeMillis();
   if ((System.currentTimeMillis() - startTime) >= 40) {
    break;
   }
  } while (result_pin.getState() != PinState.HIGH);

  // calculate the range. If the loop stopped after 38 ms set the result
  // to -1 to show it timed out.

  if ((stopTime - startTime) <= 38) {
   result = (stopTime - startTime) * 165.7;
  } else {
   System.out.println("Timed out");
   result = -1;
  }

  return result;

 }

}
PiBot.java
package com.qubecad.pi.PiBot;

import com.pi4j.io.gpio.GpioController;
import com.pi4j.io.gpio.GpioFactory;
import com.pi4j.io.gpio.GpioPinDigitalInput;
import com.pi4j.io.gpio.GpioPinDigitalOutput;
import com.pi4j.io.gpio.PinPullResistance;
import com.pi4j.io.gpio.PinState;
import com.pi4j.io.gpio.RaspiPin;

public class PiBot {

 /**
  * @param args
  */
 public static void main(String[] args) {

  // Setup GPIO Pins
  GpioController gpio = GpioFactory.getInstance();

  //range finder pins

  GpioPinDigitalOutput rangefindertrigger = gpio.provisionDigitalOutputPin(RaspiPin.GPIO_00, "Range Finder Trigger", PinState.LOW);

  GpioPinDigitalInput rangefinderresult = gpio.provisionDigitalInputPin(RaspiPin.GPIO_03, "Range Pulse Result", PinPullResistance.PULL_DOWN);

  // Create the range finder
  RangeFinder rangefinder = new RangeFinder(rangefindertrigger,rangefinderresult);

  do {
  // Get the range
  double distance=rangefinder.getRange();

  System.out.println("RangeFinder result ="+distance +"mm");
  } while (false!=true);


 }
}
Links:The Pi4J Project (http://pi4j.com/)
#IWDEV on facebook (https://www.facebook.com/groups/iwdev/)
RaspberryPi-spy.co.uk (http://www.raspberrypi-spy.co.uk)
Subscribe to:
Posts (Atom)